
Advice and inspiration
A hand-knotted rug on the wall: how can you hang it safely?

Yes, a hand-knotted rug can be displayed on a wall, and in many interiors it works more powerfully than a picture: it brings colour, scale, a soft material and drawing that can be appreciated from a distance. Vertical display also removes wear from foot traffic and furniture.
It is not automatically a gentler form of storage, however. A hanging rug is continually exposed to its own weight, light and dust. Without proper support it may develop waves, lengthen, tear at the top or suffer damage to its fringe. A good installation therefore begins with the textile's condition and even distribution of weight across the entire width, not the selection of one very strong hook.
First decide whether the rug is suitable for hanging
A sound wool rug with a firm foundation, cohesive edges and stable colours may be suitable for vertical display. Before mounting, place it face down on a clean surface and examine the reverse, top edge, sides and areas of earlier repair.
Postpone hanging and consult a textile conservator if you find brittle or powdering yarn, open splits, loose knots, separating edges, strong distortion, fragile silk, extensive old patches or active insect activity. A large, heavy, antique or valuable piece should receive a professional assessment even when it looks sound at first glance.
Colour stability can be assessed only through an appropriate conservation test in an inconspicuous place; domestic dampening is not a safe test. Arrange any necessary cleaning before installation too. Wet cleaning, household chemicals and improvised steaming on the wall are not suitable preparation.
What a wall display prevents — and what risks it creates
On the wall there is no abrasion from shoes, pressure from furniture legs or ordinary floor spills. The design reaches eye level and a large textile can soften hard architecture. Its soft surface may also reduce some sound reflections, although it will not soundproof a room.
At the same time, stress moves to the upper area. Sun can fade one half, dust settles into the pile, a damp external wall can encourage mould and a single nail concentrates the whole load in only a few threads. A successful installation addresses these new risks in advance.
Hanging methods to avoid
- Nails, screws or staples through the rug: these produce holes and point loads, while metal can corrode.
- Pegs, office clips and carpet clamps: they compress small areas, leave marks and can tear a loaded foundation.
- Rings sewn at a few intervals: the spans between them sag and may develop permanent waves.
- Suspension from fringe: fringes are exposed warp ends, not structural hanging loops.
- Adhesive tape or self-adhesive hook-and-loop on the textile: adhesive can migrate into fibres, harden and trap dirt.
- A narrow rod inserted through the rug itself: without a separately sewn sleeve it can deform the top edge.
Nor should a rug simply be pressed between glass and a hard board. Pile requires space, while a large glazed assembly needs a professionally designed frame, inert materials and secure structural fixing.
Recommended approach: continuous support across the width
For sound flat textiles, tapestries and rugs, the Canadian Conservation Institute describes a hook-and-loop system prepared so that the fastener does not stress the object itself. The soft loop component is first machine-stitched to a sleeve or broad tape of prewashed undyed cotton. Only this cotton carrier is then hand-sewn reversibly to the rug's reverse, just below the top edge.
The mating hook strip is fixed to a smooth sealed wooden batten. The batten is mounted precisely level and anchored safely to the wall. When the two halves are joined, a near-continuous strip across the width carries the rug, avoiding isolated points of tension.
Fastener width, stitch spacing, thread and the number of support rows depend on the particular rug's weight and construction. Hook-and-loop tape must never be glued or sewn directly to the rug. On a valuable object, a conservator should attach the cotton carrier, placing stitches through sound structural areas without damaging the pile.
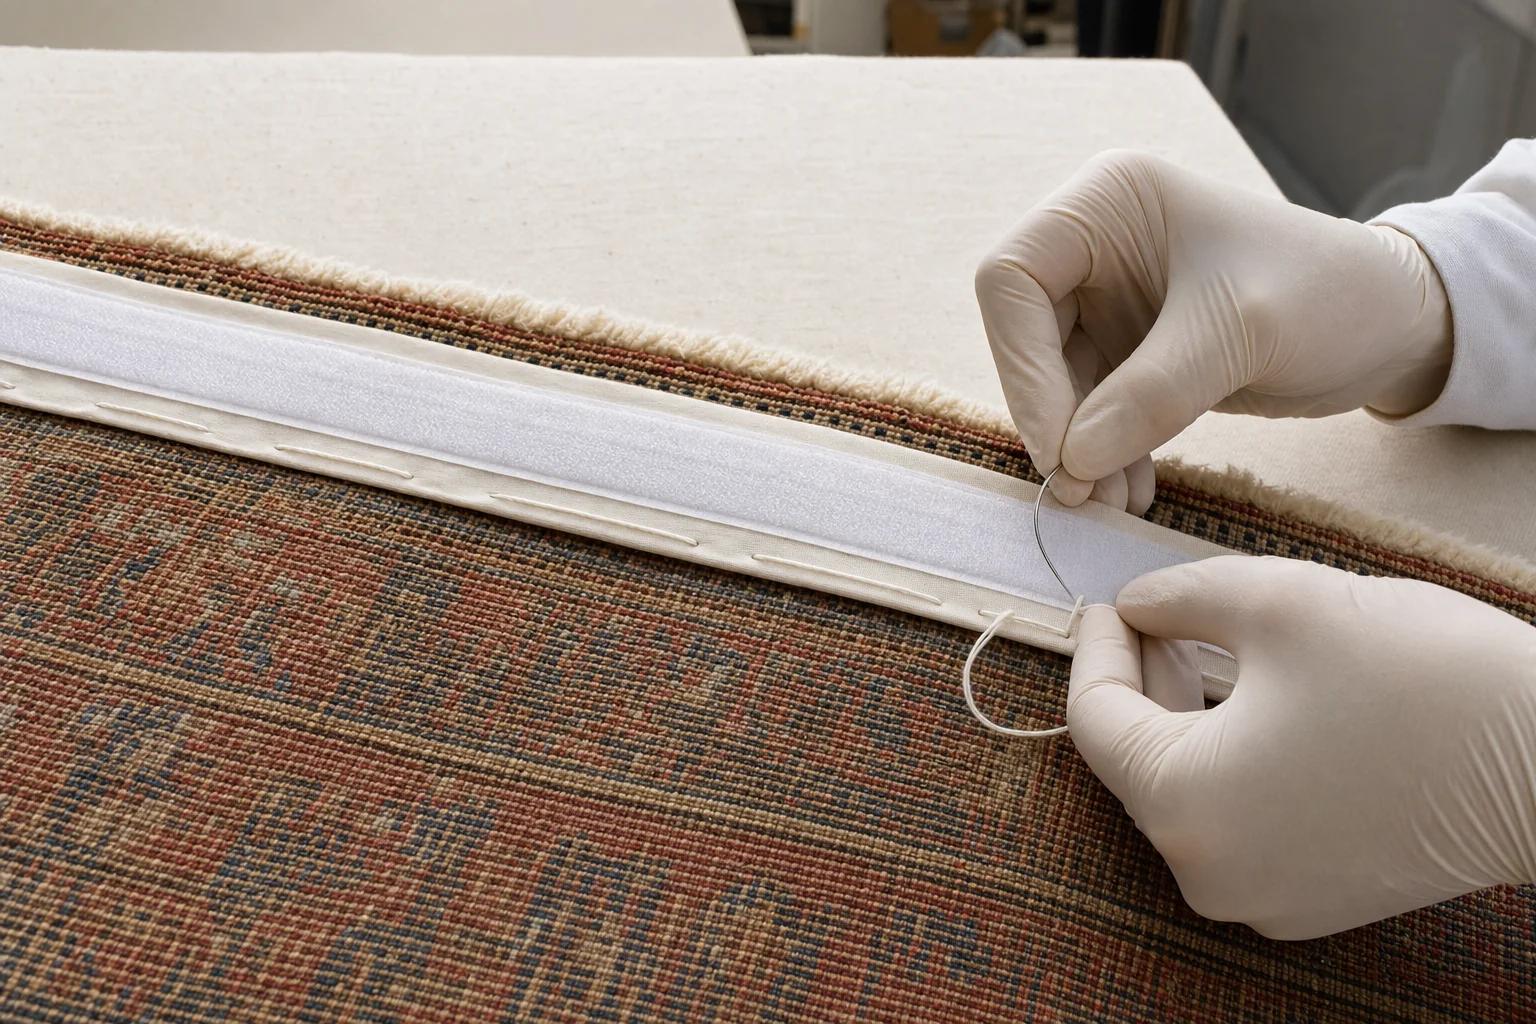
The fastener is not glued directly to the object. Its loop tape is sewn to a separate cotton sleeve that spreads the load along the upper edge.
When one top strip is not enough
On a very heavy rug, transferring all weight to one upper line may be unwise. A conservator may specify a second horizontal strip farther down the reverse, a fully padded backing or another distributed system that carries the load over a larger area.
A small light textile can sometimes be stitched to a fabric-covered rigid board with a soft interlayer. A weak or fragmentary piece may need almost complete support and a protective frame with clearance from glazing. A silk rug, archaeological fragment or textile with a brittle foundation should not be hung without an individual conservation design.
The wall and anchors must carry the complete assembly
Begin with the combined weight of the rug, batten and any frame. The timber or metal support must be fixed into a structural part of the wall — studs, masonry or another suitable substrate — with the correct anchors and an adequate safety margin. Plasterboard alone and arbitrary universal plugs may not be sufficient for a large rug.
Check for electrical cables, water pipes and heating before drilling. At least two people should handle a large piece; it must not be pulled into position by its lower edge. When removing it, separate the fastener by sliding a hand between the two tapes from one end, rather than tearing it away by the textile.
A small ventilation gap between rug and wall is useful. It reduces contact with dust, a cold or slightly uneven surface, and makes inspection of the reverse possible. Never install a rug on a damp, salt-affected or moulding wall.
Choose a position away from direct sun and heat
Light damage is cumulative and irreversible. Sunlight can alter both dyes and fibre strength; UV film does not eliminate damage from visible light. Choose an internal wall outside direct sun and avoid a window that illuminates only half the textile for part of the day.
For evening illumination, use a good dimmable LED source positioned so that it does not heat the rug. A spotlight should not form a bright pool in the centre with dark edges. For a valuable piece, limit the hours of illumination, make a reference colour photograph and consider periods of rest in dark storage.
Keep clear of radiators, fireplaces, stoves, air-conditioning outlets and strong draughts. Heat and rapid humidity changes can lead to dimensional movement, brittleness and distortion.
Kitchens, bathrooms and damp basements are poor locations
Cooking aerosols, grease and soot are difficult to remove from pile. Bathrooms and unventilated basements experience moisture changes and an increased risk of mould. A wall below pipework, an air-conditioning unit or a place with a history of leaks is equally unsuitable.
In a living space, keep the rug away from pets, children's hands, chair backs and opening doors. Its lower edge should not rest on a sofa or touch the floor; friction would reintroduce the wear that vertical display was intended to avoid.
Choosing the height and relationship to furniture
Before drilling, mark the complete outline with low-tack paper tape and view it from principal entrances as well as from a seated position. Above a sofa, a rug often looks composed when it is narrower than the furniture group and a visible gap remains above the back cushions. It need not be mechanically centred on the wall; its relationship to the seating or dining group matters more.
On a directional design, establish which end is the top. A pile rug also changes in colour with viewing and light direction. Open it on the floor in both orientations before deciding which end will hang uppermost.
A large rug benefits from visual breathing room. Many small pictures close to its border weaken its silhouette and complicate cleaning. An independent wall field and even illumination usually show the hand-drawn design most clearly.
Cleaning a wall-mounted rug
Vacuum only when the rug is stable and the mount is secure. Use low suction, a smooth upholstery nozzle without a rotating power brush and a protective screen between nozzle and pile. Work gently from top to bottom without pressing on or pulling the textile.
Clean the top of the mounting batten too, as dust collects there. Do not use a feather duster that can catch projecting fibres, perfumed sprays, steam or a domestic carpet-cleaning machine. Do not treat a stain while the rug is vertical; remove it safely and seek specialist advice.
Inspection is part of the installation
After the first week and at least every few months thereafter, check level, top-edge distortion, stitch tension, loose sides and the fixings. Inspect the reverse and the space near the wall when the design permits. Look for fresh dust, larval cases, webbing, small droppings, a damp smell or colour change.
A photograph taken in similar light helps reveal fading and deformation. If the centre sags, the top edge ripples or stitches begin to cut into threads, take the rug down — adding a few isolated hooks will not solve a failure of distributed support.
Which display method should you choose?
| Type and condition | Suitable approach | Who should handle it |
|---|---|---|
| Sound medium-size wool rug | Continuous hook-and-loop on a sewn cotton carrier and secure batten | Experienced installer; ideally a conservator for the stitching |
| Small lightweight textile | Padded rigid support with distributed conservation stitching | Textile-experienced framer or conservator |
| Very heavy rug | Multiple horizontal supports or a bespoke full-area system | Textile conservator and structural installer |
| Silk, fragile or antique piece | Bespoke supportive mount, possibly a protective frame | Textile conservator |
| Rug intended to return to the floor | Fully reversible sewn carrier without glue or holes | Specialist who can remove the system safely later |
Pre-installation checklist
- Assess the rug's condition, material, dimensions and weight.
- Photograph the face, reverse, sides, ends and every earlier repair.
- Select a dry stable wall without direct sun, heat or leak risk.
- Mark the outline and confirm pattern orientation and pile direction.
- Design continuous support across the width; never use fringe or point clips.
- Verify wall capacity and the correct anchors.
- Install with two or more people and never pull the textile.
- Record the installation date and schedule the first inspection.
A properly mounted rug can be a powerful and reversible form of display. What matters is not whether the hardware is invisible, but whether it truly supports the textile evenly and whether the environment slows fading, soiling and mechanical stress.